All the Segmenting Options
Learn how to use subscriber profiles, audience fields, e-commerce, and integration data to target and filter subscribers into segments.

Get the job done with a pro
From training to full-service marketing, our community of partners can help you make things happen.
![]()
QuickBooks makes managing your finances easy and integrates with Mailchimp, allowing you to use your paid invoices to create smarter, more personalized marketing campaigns.
Mailchimp offers many segmentation options, so you can target the right contacts. There are endless possibilities when it comes to segments in Mailchimp, but some combinations are used more than others to target email and transactional contacts.
In this article, you’ll learn how to create segmentation combinations for common uses.
Note
This article focuses on common segmentation combinations for email and transactional contacts. To learn about the available segmentation options for SMS contacts, check out All the Segmenting Options.
If you work with Mailchimp automations, you can use the report data to segment subscribed email contacts. Let’s say you use automations to educate. You could segment for subscribed email contacts who’ve already completed 1 of your courses and are also interested in other course subjects.
In this example, we'll pull a segment of subscribed email contacts who’ve completed an automation and joined a group or multiple groups in your audience.
To keep your audience fresh, ask your subscribers to update their preferences. Your most recent and more engaged email contacts may have already provided the data you want, so you don't necessarily need to send this type of email to them.
In this example, we'll pull a segment of subscribed email contacts who joined your audience more than 6 months ago, and who have a low contact rating of 1 or 2.
You can target email content to subscribed email contacts interested in certain topics. If you've added new groups to an audience, or you aren't reaching your lower-rated contacts, you could ask them to join groups.
In this example, we'll pull a segment of subscribed email contacts who either have a low contact rating or who aren't listed in any group.

Note
There is a 5-condition limitation on building segments. However, you can select multiple group names in 1 condition.
Use advanced segments to create complex, nested segments with many conditions. This feature is included with the Standard plan or higher.
If you want to promote a product to students and faculty, you could segment your audience by subscribed email contacts with .edu email addresses. This can also be done with employees at a particular company, using their "company.com" domain.
In this example, we'll pull a segment of subscribed contacts with the same email domain.
If you sent an email and didn't get the response you expected, you could send a follow-up email to the subscribed contacts who didn't open the email.
In this example, we'll pull a segment of subscribed email contacts who received your most recent email but didn't open it.
If you have an audience from all over the world, some of your emails may vary based on your subscribed contacts’ locations. Use a location condition with email interaction to find subscribed email contacts who might be interested in similar content in a specific area.
In this example, we'll pull a segment of subscribed email contacts who opened a specific, related email, and who live within a target area.
If you're using Mailchimp's VIP feature, you can segment subscribed contacts using that status. Combine the VIP status with purchase date, signup date, or other conditions to create a segment of VIPs with the behavior you're looking for.
In this example, we'll pull a segment of subscribed email contacts who are VIPs and who have spent a certain amount of money on products from a particular store.
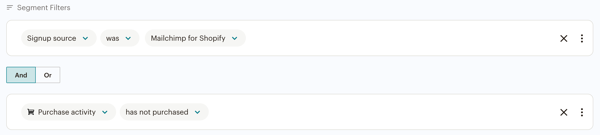
Segments work with Mailchimp integrations, too. You can target customers based on their e-commerce data.
In this example, we'll pull a segment of contacts who made a purchase in the past, but haven’t bought anything recently.
Other ideas for using e-commerce data to build segments include:

Mailchimp's SurveyMonkey integration keeps track of some important data, like whether a subscribed email contact has started or completed a particular survey. Combine email interaction and SurveyMonkey activity to pinpoint subscribed email contacts who may have received a survey email and started it, but haven't finished.
In this example, we'll combine 3 conditions to pull a segment of subscribed contacts who were sent an email with your SurveyMonkey link, started the survey, but have not completed it yet.
Technical Support

Have a question?
Paid users can log in to access email and chat support.
Learn how to use subscriber profiles, audience fields, e-commerce, and integration data to target and filter subscribers into segments.
Your Mailchimp audience contains a lot of data about your contacts. You can use this data to create segments and send targeted campaigns.