Create a Regular Email
Learn how to create a regular email in Mailchimp.

Get the job done with a pro
From training to full-service marketing, our community of partners can help you make things happen.
![]()
QuickBooks makes managing your finances easy and integrates with Mailchimp, allowing you to use your paid invoices to create smarter, more personalized marketing campaigns.
Use our classic email builder to design a marketing email to sell products, promote your brand, boost audience engagement, and more. Arrange drag-and-drop content blocks to quickly get the look you need, or code your own template from scratch.
In this article, you'll learn the basics to design an email with the classic builder in Mailchimp.
Here are some things to know before you begin this process.
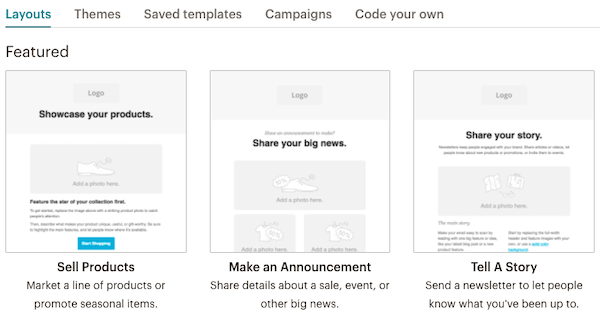
When you create a regular email in Mailchimp, you'll choose a template in the Content section of the email builder. The template you select will be the foundation of your design.
Depending on your marketing plan, you may not have access to all of the template options. To find out what features are included in each plan, check out our pricing page.
Here are the different template categories and what they include.
After you choose a template, you'll move on to the design step. Use content blocks to add and format text, upload images, link to files, and more.
All templates show placeholder text and images to help you begin to design your email. Depending on the template you choose, you can add, delete, move, and replicate content blocks to create the look and feel you want.
Our drag-and-drop editor allows you to duplicate, delete, and rearrange content blocks on the fly. Drag and drop a variety of content blocks into your layout and rearrange them to customize the look and feel of your email.
Note
For more information on each email builder and their content blocks, check out About Mailchimp’s Email Builders.
The best way to add text to your email is to type it directly into the content block editing pane. If you prefer to work outside of the email builder, copy and paste your content from a simple text editor, like Notepad or TextWrangler.
Avoid rich-text word-processing programs, like Word or Publisher. They add styling code to the text that can prevent your ability to style content in the email builder. If you want to copy content from a rich-text editor, website, or email program, click the Paste as plain text icon on the editor toolbar to add your text.

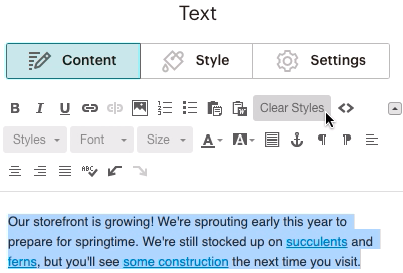
If content has already been added to your email and you didn't use the Paste as plain text option, or if content doesn't update when you apply styling to your text, click Clear Styles and try again.
Clear styles to remove any conflicting formatting or styles that were brought in when you added content. This only removes the formatting that's been applied to your text and doesn't remove the text itself.
To clear styles from your content, follow these steps.
Styles and settings for your email design can be applied from a few different places. Each section in your email is related to another in a hierarchy, so the styles you set in one area of the email builder may affect other sections.
Note
Once you're comfortable with the basics of designing with the classic builder, check out our Email Design Guide for more tips on designing for email marketing.
Technical Support

Have a question?
Paid users can log in to access email and chat support.
Learn how to create a regular email in Mailchimp.
Whether you're an expert or just starting, Mailchimp has an email template for you. Learn about different types of templates and how to pick one.
When you're designing an email, you can switch your template at any time to quickly change the look of your campaign.